연산자
Whiteship 스터디 할래
3주차 과제: 연산자
-https://github.com/whiteship/live-study/issues/3
1. 대입 연산자 (Assignment Operator)
= Simple assignment operator
2. 산술 연산자 (Arithmetic Operator)
+ Additive operator (also used for String concatenation)
- Subtraction operator
* Multiplication operator
/ Division operator
% Remainder operator
3. 단항연산자 (Unary Operators)
3_1. 양,음수의 표기
- + Unary plus operator; indicates positive value (numbers are positive without this, however)
- - Unary minus operator; negates an expression
3_2. 증감연산자 (Increment, Decrement Operators)
- ++ Increment operator; increments a value by 1
- -- Decrement operator; decrements a value by 1
- These could be Prefix or Postfix operators
3_3. 논리부정연산자 (Logical Complement Operator)
- ! Logical complement operator; inverts the value of a boolean
4. 비교연산자/관계연산자 (Equality and Relational Operators)
- == Equal to
- != Not equal to
- > Greater than
- >= Greater than or equal to
- < Less than
- <= Less than or equal to
5. 논리 연산자 (Conditional Operators)
- && Conditional-AND
- || Conditional-OR
- ?: Ternary (shorthand for if-then-else statement) - 밑에서 더 자세하게 다뤄보자.
-Source of 1.~5. : https://docs.oracle.com/javase/tutorial/java/nutsandbolts/opsummary.html
5_1. 3항 연산자 (Ternary Operator)
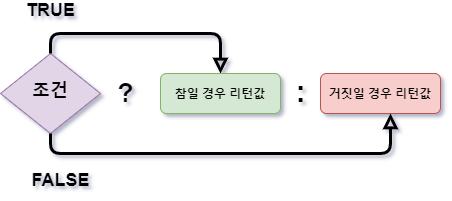
- 조건문의 역할을 연산자로 수행할 수 있다.
- 3항 연산자는 C언어의 조상이라고도 할 수 있는 60년대의 CPL에서 유래했는데 현재 e1 ? e2 : e3 의 형태는 원래 e1 → e2, e3 이었다.
- 아래 예제에서 Condition이 참일 경우 Value1이, 거짓일 경우 Value2가 Variable에 들어간다.
- 예제에서 Condition에는 true나 false를 갖는 boolean 형이 들어간다.
- 예제의 Condition이 true일 경우 Value1의 값이 Variable에 대입된다.
- 예제의 Condition이 false일 경우 Value2의 값이 Variable에 대입된다.
int Variable = Condition ? Value1 : Value2;
- 일반적인 이용의 예제
Strng name = case.equals("uppercase") ? "JOHN" : "john";
- Null 체크를 하는 예제
String value = object != null ? object.getValue() : null;
- Math max(), min() 함수와 같은 기능을 구현하는 예제
int val1 = 10;
int val2 = 20;

int max = val1 >= val2 ? val1 : val2;
int min = val1 <= val2 ? val1 : val2;
- Math abs() 함수와 같은 기능을 구현하는 예제
int val1 = 10;

int max = val1 >= 0? val1 : -val1;
- 중첩된 3항 연산자 예제
int num = scanner.nextInt();
String result = (num == 0) ? "0" : ((num > 0) ? "양수" : "음수");
- 다른 연산자와 함께 활용한 예제
String input;
.
.
int value = (input == null || input.equals("")) ? 0 : Integer.parseInt(input);
-Sources :
https://en.wikipedia.org/wiki/%3F:
http://tutorials.jenkov.com/java/ternary-operator.html#ternary-operator-condition
6. 비트연산자 (Bitwise and Bit Shift Operators)
- ~ Unary bitwise complement
- << Signed left shift
- >> Signed right shift
- >>> Unsigned right shift
- \& Bitwise AND
- \^ Bitwise exclusive OR
- | Bitwise inclusive OR
-Source : https://docs.oracle.com/javase/tutorial/java/nutsandbolts/opsummary.html
6_1. Unsigned right shift를 이용한 중간값 구하기
int max, min, mid;
max = 21_000_000_000;
min = 20_000_000_000;
mid = (max + min) / 2;
System.out.println(mid); // Overflow

// 이럴 때 Bitwise shift를 이용하여 오버플로우를 바로잡을 수 있다.
mid = (max + min) >>> 1;
System.out.println(mid); // 2050000000

// 하지만 주어진 두 수가 양수일 경우에만 사용 가능하므로 올바른 해결은 다음과 같다
mid = min + (max - min) / 2; // 2050000000
-Source : Whiteship live study
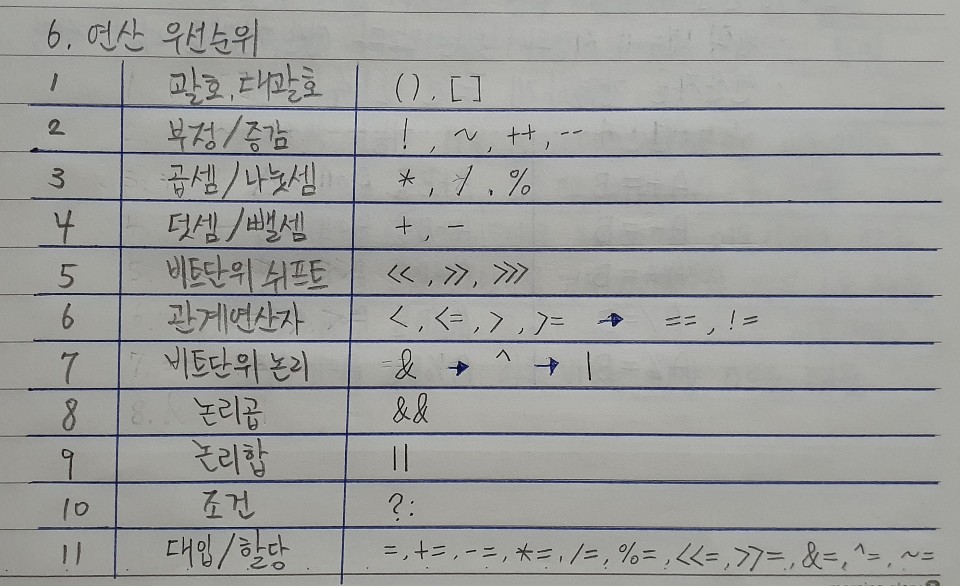
연산자의 우선순위
InstanceOf
- 이항연산자로서 오브젝트가 주어진 타입에 속하는지 확인하는데 이용되며 true나 false의 값을 돌려준다.
- 오브젝트를 캐스팅 하기 전에 instanceOf를 이용하여 적합한 클래스인지 확인해 두어야 한다. 그렇게 함으로서 런타임에서 발생할 수 있는 ClassCastException을 방지할 수 있다.
- 기본 신텍스는 다음과 같다
(object) instanceof (type)
- 위의 예제에서 “object”가 “type”의 인스턴스라면, true가 리턴되고 아니라면 false가 리턴된다.
- 다음은 자식클래스의 오브젝트가 부모클래스의 인스턴스이기도 한지를 InstanceOf를 이용하여 확인하는 예제이다.
// 부모클래스
class Animal {
}

// 자식클래스
class Dog extends Animal {
}

class Main {
  public static void main(String[] args) {

    // 자식클래스의 오브젝트 생성
    Dog d1 = new Dog();

    // d1이 자식클래스의 인스턴스인지 확인
    System.out.println(d1 instanceof Dog);        // true 출력

    // d1이 부모클래스의 인스턴스인지 확인
    System.out.println(d1 instanceof Animal);     // true 출력
  }
}
- 마찬가지로 인터페이스를 구현한 경우를 테스트 해도 똑같은 결과를 볼 수 있다.
-Sources :
https://www.baeldung.com/java-instanceof
https://www.programiz.com/java-programming/instanceof
화살표(->) 토큰 (Arrow Token)
자바에서 람다식(Lambda)을 지원하기 위해 자바8버전 부터 새로 지원하기 시작한 연산자이다. 이는 자바1의 출시 이후 가장 중대한 업데이트중 하나라고 할 수 있다. 코드가 간결해지며 가독성이 향상된다. 람다식 연산자(Lambda Operator) 혹은 화살표 연산자(Arrow Operator)라고도 알려져 있다. 이 화살표 연산자를 이용하여 람다식의 매개변수(Parameter)를 실행문(the body)과 구분한다.
아직 사용해보지 않은 기능이고 더 깊이 공부해야 할 것 같아서 람다식에 대해서는 다른 포스트를 작성한 뒤 링크를 추가하겠습니다.
-Source :
https://dzone.com/articles/java-8-lambda-functions-usage-examples#
JDK 13 - Switch
- Switch문은 자바의 초창기부터 항상 유용한 기능으로 자리해 왔다. 그동안 크게 바뀌지 않았던 Switch에 Java 12와 Java 13에 거쳐서 큰 변화가 만들어 졌으며 더욱더 강력한 기능으로 자리매김 했다.
- Java의 Switch문은 기본적으로 C와 C++의 기능을 따라 만들어 졌다고 봐도 된다.
- Java 13에는 Java 12의 기능에 더해져 yield 키워드가 도입되었다.
- 더이상의 break는 없다!
- Java 12의 value break 신택스는 Java 13부터는 컴파일되지 않는다.
...
switch (mode) {
  case "a":
  case "b":
    break 1;
  case "c":
    break 2;
  case "d":
  case "e":
  case "f":
    break 3;
  default:
    break -1;
};
...
- 대신 yield를 사용해서 값을 돌려줄 수 있다.
...
switch (mode) {
  case "a", "b":
    yield 1;
  case "c":
    yield 2;
  case "d", "e", "f":
    System.out.println("다중행의 블럭도 사용 가능!");
    yield 3;
  default:
    yield -1;
};
...
- 람다식 표현은 계속해서 사용이 가능하다.
...
switch (mode) {
  case "a", "b" -> 1;
  case "c" -> 2;
  case "d", "e", "f" -> {
    System.out.println("다중행의 블럭도 사용 가능!");
    yield 3;
  }
};
...
- 그래서 break랑 return이랑 yield의 차이가 뭐라구?
You can think of a return statement as transferring control back to the invoker, whereas yield transfers control back to the innermost enclosing switch expression. The keyword break is about breaking out of a switch statement. Note that the introduction of yield has triggered a wider discussion around the management of keywords and reserved identifiers in Java. Although return and break are keywords, yield is currently proposed as a restricted identifier just like var, which was introduced in JDK 10. The difference between the two is small but potentially important: You can’t use break as a variable name because break is a keyword, but you can use var as a variable name because it is a restricted identifier.
Although the introduction of the yield statement for a switch expression is a minor change, its introduction in the language opens future opportunities because it might be possible to use it for other features. For example, many other programming languages have adopted the word yield for sophisticated constructs such as coroutines and generators. (For example, it is supported in Python, JavaScript, and Scala.) On the other hand, it’s important to remember that in Java, yield as a statement is currently supported only in switch expressions. Don’t be confused by other things named yield such as Thread.yield and features in other programming languages.
-Sources :
https://mkyong.com/java/java-13-switch-expressions/
* JDK13은 아직 경험해보지 못했으므로 출처 글을 다시 읽어보고 연습도 해보자. 특히 위의 출처의 경우 자바 각 버전마다 업데이트 내용을 잘 설명해 두었으니 꼭 다시 방문하자.
https://blogs.oracle.com/javamagazine/inside-java-13s-switch-expressions-and-reimplemented-socket-api
https://www.vojtechruzicka.com/java-enhanced-switch/